Baked Squash Chips

Its 11 PM on a Sunday night in December, and you’re studying for your hardest final exam Monday morning.  The late night munchies are starting to creep up on you, and you reach for a bag of potato chips and…. STOP right there!  Lets think about this choice for a second:

  1. You are probably not actually hungry, but stress speeds up your metabolism.
  2. Eating promotes a feeling of calmness and satiety.
  3. Potato chips will not make you fill satisfied, but probably increase your cravings.
  4. The salt in potato chips will make you feel thirsty, and you will be more likely to reach for that ice cold, sugary soda.

Luckily, I have a quick solution that will satisfy the most intense late night cravings for sweet and salty goodness: Baked Squash Chips.

Squash is one of my favorite fall vegetables to cook with.  You can add it in soup, roast it and throw it into your veggie lasagna, make a squash puree, and now you can make chips.  You will need your squash of choice (I like butternut), salt, and olive oil.

Preheat the oven to 375 degrees.  Line a baking pan with tin foil or parchment paper.  Now you have the option to peel the squash or not, I have done it both ways and I do not have a preference   Thinly slice the squash with a sharp knife or mandolin.  I like using a mandolin because then all of the slices are the same width.  You can find these for cheap at T.J. Maxx or Marshalls in the cookware aisle!

Toss your squash slices in a bowl with olive oil so they are evenly coated.  Arrange the slices on the baking pan so they are not touching.  However, these chips will not spread like cookies so they can be fairly close together.  Sprinkle a little salt over the chips for a little extra flavor.  Salt in

moderation is not bad for you, and it can actually have beneficial effects for some people.  If you are on a no salt diet, use a different spice/ herb such as rosemary or thyme.  Bake for about 20 minutes or so depending on the thickness of your slices.

There you go!  Now you have a healthy late night snack that will leave you feeling satisfied.  You could also serve these delightful chips as a side with a salad or wrap.  Salty and sweet truly is the best of both worlds!

Pesto Baked Chicken

This Pesto Baked Chicken recipe is great because it takes very little time to prep and there are very few ingredients involved.  You will need:

  1. Raw or frozen chicken breasts (one per person)
  2. Your favorite pesto (I like Buitoni’s)
  3. Tomatoes, sliced (2-3 slices per breast)
  4. Fresh mozzarella, preferably sliced not shredded

Before you start preparing the chicken, preheat the oven to 400 degrees.  Cover a baking sheet in foil.  It is important to use a baking sheet with sides because the juices of from the chicken will run while its baking.  Place your chicken breasts on the prepared baking pan.  One of the beauties of this meal is that it is so simple to make

for one person, or to add more chicken breasts on the pan for last minute guests.  If you are using frozen chicken breasts you do not need to let them thaw, but consult the package directions for baking time.

Now that your chicken is on the pan, spread the exposed side of each breast with the pesto.  I LOVE pesto so I always use double the amount you need, which is only about 2 tablespoons per breast.  Place the pan in the preheated oven, middle rack, for about 40 minutes if the chicken breasts are frozen.  You will probably only need 25-30 minutes for raw chicken breasts depending on their size.

With 3-5 minutes left for baking time, top each chicken breast with the sliced tomato and slice mozzarella.  Once the cheese is melted you can remove the breasts from the oven and let cool for about 5 minutes before serving.

This recipe is so simple and so versatile.  It is really great for a last minute gourmet meal.  Instead of pesto you could use tapenade, butter, or another favorite sauce.  You can substitute the tomatoes for another vegetable and you can use any type of cheese.

Serve with a side of rice or vegetables and enjoy!

Salmon Burgers with Lemon Risotto

I always love a good burger in the summertime!  There is just something about firing up the grill and flipping a couple patties.  It reminds me of summer cookouts and tailgating with my friends.  One of the great things about burgers is that they are so versatile.  You can use just about any meat and stuff them with whatever your heart desires.  Personally, I’m going through a bit of a seafood phase.  I’ve never actually cooked seafood before, more specifically fish, so I thought I would start with a nice salmon burger.  I’m very pleased with the recipe I found on the internet.  It’s quick, simple and delicious.  Here is the link for Kalyn’s Kitchen “Grilled Fresh Salmon Burgers with Caper Mayonnaise“.  I made a few minor alterations to Kalyn’s recipe:

1.  I replaced the whole wheat breadcrumbs with gluten free breadcrumbs.

2.   I used scallions in place of the chives.

3.  I did not have Sriracha sauce so I substituted it with Frank’s Hot Sauce.

I was able to get about 4 large patties and 2 small patties out of the ground salmon mixture.  I also experimented with the caper mayonnaise and it turned out to be delicious.  I would highly recommend trying it with the salmon burgers.  My only thought is that the saltiness of the capers may be too overwhelming for some people, and next time I think I will put the caper mayonnaise through a food processor so the capers get pureed and more evenly distributed throughout the mayonnaise.

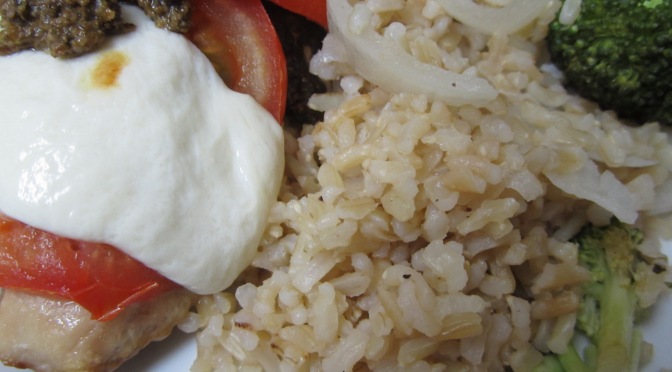
Now, you absolutely cannot have a barbecue without sides.  Potato salad, mashed potatoes, corn, you name it!  And since I was experimenting with the salmon burgers, I decided I may as well continue my experimentation further.  My first thought was what is a good accompaniment for salmon?  I instantly thought of lemon.  I did a little more research on the web, googling salmon and lemon, and I found quite an array of recipes for lemon salmon risotto.  Well I already had the salmon, so I went with the lemon risotto.  Before this occasion, I had never made risotto.  The task seemed daunting and too time consuming.  I am so happy that I rose to the challenge because my lemon risotto turned out beautifully.  It was citrusy and cheesy and everything that I had hoped for.  I used this “Lemon Rosemary Risotto” recipe from cookitaly.com.  Again, I made a few alterations to make the risotto my own:

1.  I used Arborio rice instead of Carnaroli.

2.  I completely forgot the rosemary when I was grocery shopping so I just left that out, and it did not affect the recipe.

3.  I cooked the rice on a lower heat for about 25-30 minutes instead of 18.  It took a little longer for the rice to reach the creamy, risottoesque consistency.  Also, I ran out of vegetable stock so I had to used a little bit of hot water to finish the stirring process.

I am so excited to make risotto again and experiment with different “add-ins” so to speak.  This recipe could probably serve 6-8 people.  Next time, I would love to try the lemon risotto with a simple, grilled salmon filet.  The salmon burger with the caper mayonnaise and the cheesy, lemon risotto was a little rich together for my taste!  However, they were both very delicious experiments.  I especially love the salmon burger because it is such a great way to introduce seafood into your diet.  Fish is so healthy when it is eaten the right way.  If you don’t care for fish or other seafood, try this burger recipe and it might just grow on you.


WHO WANTS LEFTOVERS!?

Confession time, I absolutely love leftovers.  You know food is really good when you are excited to eat it the next day and the next.  Well here is one idea of how you can spruce up your leftover salmon burgers: PUT IT IN A SALAD!  For dinner I made a fresh salmon chopped salad.  This was a last minute idea, so I was happy to find an abundance of ingredients in my refrigerator that go great in a salad with salmon.

  1. Iceberg and spinach lettuce
  2. Red onion
  3. Tomato
  4. Avocado
  5. One salmon patty

For the dressing, I just used leftover caper mayonnaise.  It went really well with the avocado and red onion flavors.

On a side note, my mom has this awesome bowl for making chopped salads.  You literally put everything into the bowl and use a cutting tool that resembles a pizza cutter to chop everything together.  This is a lot less work than chopping everything by hand.  I will try and find out where she bought it from.

For breakfast tomorrow, I think I will try eggs benedict with salmon.  Bon appetit!

S’mores in Mason Jars

Mason jars are my new obsession!  There are so many creative things you can do with them, especially related to food.  Check out this awesome webpage for some inspiring ideas: 50 Different Foods You Can Put in a Jar.

The only recipe I have tried so far is the “S’mores Cake in a Jar”, and it was absolutely delicious.  I have adapted this recipe from how sweet it is.

Crust:

  • 1 1/2 cups graham cracker crumbs
  • 1/2 stick butter
  • pinch of salt

Melt the butter and mix in the crumbs and salt.  Grease the bottom and sides of 4 jars, and press the crumb mixture into the bottom of each jar.

Preheat the oven to 350 degrees.

Cake:

  • 1 1/8 cups all purpose flour
  • 1/4 cup dark cocoa powder
  • 1 1/4 teaspoon baking soda
  • 1/2 teaspoon salt
  • 3/4 cup brown sugar
  • 1 egg
  • 1 teaspoon vanilla extract
  • 1/2 cup milk
  • 1/2 cup + 1 tablespoon heavy cream (optional)
  • 1/2 cup butter, melted
  • 2 tablespoons sour cream (optional)

Mix all wet ingredients together.  I opted for a healthier cake by substituting the milk and heavy cream with Almond milk.  I left out the sour cream and added a little more butter to keep the balance of ingredients.  In a separate bowl mix all dry ingredients together.  Then gradually add the dry ingredients into the wet mixture.  Divide the cake batter between the 4 jars with the crumb mixture.

Place the jars in a baking dish and add 2 cups of water to the bottom of the dish.  Bake for about 30 minutes.

Press a few marshmallows into the top of each jar.  Broil them in the oven until golden brown or slightly melted.  This will happen very quickly, so keep an eye on your marshmallows, only about 1 minute or so is necessary.  On my first try the marshmallows exploded everywhere!

BBQ Chicken

School is out and summer is right around the corner!  Now who doesn’t love a good summer barbecue?  These are my favorite social events of the summer.  Barbecues bring friends and family together to listen to good music and eat amazing food.  Unfortunately, the weather does not always cooperate with your party plans, especially living in the Midwest.  Just the other day it was a steamy 80 degrees out, and in a matter of minutes, the sky was hailing!  So if the weather decides to “rain on your parade”, then you can make this simple barbecue chicken in your kitchen, no problem!

I am excited to say that this was my first, successful chicken dish!  I always thought that raw chicken seemed a little gross and intimidating.  So I did a little research on how to cook the perfect chicken, and I found this awesome webpage: How to Cook Moist & Tender Chicken Breasts Every Time.  I’m telling you, this is fool proof!

However, since I was going to cook the chicken in the oven to get the barbecue sauce nice and caramelized, I tweaked the steps a little bit.

First, season the chicken to your liking.  I just salt and pepper each side to keep things simple for my first experiment.  Next, I browned the chicken breasts in a skillet for about 30 seconds-1 minute on each side.  Remove the chicken from the pan.  I decided to chop up about half a white onion and sauté it with olive oil in the skillet to give the chicken a little more flavor.  Once the onions are close to caramelization, return the chicken to the skillet.  Add water to the skillet, put the lid on, and steam the breasts for 10 minutes.

Transfer the chicken breasts to a sheet pan covered with foil.  It is best to use a pan with sides incase the sauce decides to run off the foil.

For the barbecue sauce I mixed my favorite Jack Daniel’s Barbecue Sauce, Hickory Brown Sugar, with a little honey.  I used about a cup of sauce for 4 strips of chicken.  You kind of have to eye ball it and make a little extra incase.  Then, use a grilling brush to baste one side of each strip with your sauce.  Bake at 350 degrees for about 20-25 minutes.  Continue turning each breast every 5-10 minutes or so and continue basting with the sauce.  I broiled the chicken breasts for the last 5 minutes to get a crispier skin.

The hardest part about this recipe is not drying out the chicken!  So watch it carefully and enjoy your barbecued meal!

Pasta Salad

Pasta Salad is a great way to use up leftovers!  It takes a matter of minutes to assemble, and this is a fun activity that kids can help with.  For this colorful dish I tossed together:

  • Vegetable based, elbow macaroni
  • Leftover chicken, diced
  • Diced tomatoes
  • Diced cucumbers
  • Feta cheese
  • Olive oil
  • Balsamic vinaigrette
  • Salt and pepper to taste

“Soufflé” Stuffed Chicken

Having a dinner party?  Cooking a romantic dinner?  Try this easy and healthy “Soufflé” Stuffed Chicken from The South Beach Diet Cookbook, page 226.  The name alone is sure to impress any dinner guest!

Do NOT be intimidated!  This recipe has a lot of steps, but they are very easy to follow.  Trust me, I made this in my little apartment and it was a breeze.

Ingredients:

  • 1 package (12 oz) Stouffer’s frozen spinach soufflé (NOT THAWED)
  • 4 boneless, skinless chicken breasts, pounded to 1/4″ thickness
  • 2 tablespoons extra virgin olive oil
  • 2 cloves garlic, sliced
  • 1 cup chicken broth
  • 2 tablespoons lemon juice
  • 1 teaspoon Dijon mustard
  • Salt
  • Ground black pepper

Instructions:

  1. Preheat oven to 350.
  2. Using serrated knife, cut the spinach soufflé crosswise into 4 equal pieces.  Top half of each whole breast with one of the pieces of soufflé.  Fold half of the chicken over the filing and fasten the ages with wooden picks.
  3. Heat the oil in a large skillet over medium-high heat.  Add the garlic and cook for 3 minutes, or until golden.  Discard the garlic.  Add the chicken breasts to the skillet and cook for 7 minutes per side, or until well-browned on both sides.
  4. Remove the chicken breasts to an oven-proof dish.  Bake in the oven for 30 minutes, or until a thermometer inserted in the thickest portion registers 170 degrees and the juices run clear.
  5. While the chicken is baking, add the broth, lemon juice, mustard, salt, and pepper to a large skillet.  Heat to boiling.  Reduce the heat to low, over, and simmer for 20 minutes, or until the sauce is reduced about 1/2.
  6. To serve, remove and discard the wooden picks.  Arrange the chicken on a warm serving platter, and spoon the sauce over the chicken.  Garnish with chopped parsley, lemon, and a parsley sprig if you desire.

This recipe serves 4.

Mexican Calzone

Everybody loves tacos!  They are hot, cheesy and crunchy.  However, they are also one of the messiest finger foods.  I’m one of those people who always stuffs the taco or burrito a little too full.  The end result is a drippy mess.  So when you’re in the mood for Mexican, and you don’t want to deal with sour cream and salsa hands, try these delicious Mexican Calzones!

For the calzone:

This is a quick and easy pizza crust recipe from Bisquick.  Simply mix together 1 1/2 cups Original Bisquick mix and 1/3 cups hot water.  Form the dough into a ball and roll out to desired thickness with a rolling pin.

Now for the fun part!  You can stuff the calzone with anything your heart desires.  Since I don’t have a lot of time on my hands, being a full-time college student, I used mostly canned or pre-made foods.  My calzone contains refried beans, Spanish rice, black olives, diced tomatoes, cheese, and jalepeños.

Once you have finished layering the stuffings on top of the dough, fold the circle in half and press the ends together with a fork.  If the dough does not stick together, brush a little water or egg wash along the inside edges.

Bake at 350 degrees for about 10-15 minutes.  Garnish with sour cream and guacamole.  These babies cool down fast so be ready to eat it right out of the oven!

Apricot Hamantashens

What exactly is a Hamantashen?  Well, for those of you who have never experienced the delight of eating a Hamantashen, it is a triangular shaped cookie traditionally eaten on the Jewish celebration of Purim.  The cookie itself is a perfect combination of the sugar cookie and the shortbread cookie.  I like to fill my Hamentaschen with jams such as raspberry, boysenberry, and apricot.  However, other traditional fillings include poppy seed, chocolate, dates, and even cheeses.  Really you can fill it with whatever floats your boat at the time!  For Purim this year, I made my dad’s favorite kind, APRICOT.  You cannot possibly eat just one, don’t say I didn’t warn you!

Ingredients:

  • 1 cup butter
  • 1 cup sugar
  • 2 eggs
  • 3 cups flour
  • 2 1/2 teaspoons baking powder
  • 2 teaspoons vanilla

For the filling:

  • 1 jar of Apricot preserves (or jam or your choice)
  1. Mix all of the cookie ingredients together to form a soft dough.  You may find it necessary to add a little more flour.  My last batch was a little on the sticky side.  If the dough is too soft to handle, let it chill in the refrigerator for about 30 minutes.
  2. On a floured surface, roll out the dough to about a 1/8 inch thickness.  Using a circular cookie cutter or a drinking glass, cut the dough into about 3 inch diameter circles.
  3. Spoon a little of the apricot preserves into the center of each circle.  Fold up the sides of the circle to form a triangle.  Pinch the corners together and smooth the dough with your fingers.  Be gentle these cookies are delicate before they are baked!  If the corners will not stay together, wet the tips of your fingers and pat each corner lightly.
  4. Bake the cookies at 375 degrees on a non-stick cookie sheet.  These cookies are tricky to bake so watch them carefully!  I usually put them in for about 12 minutes, but I like mine a little crispier on the outside.
**This recipes yields around 30 cookies.
Image
The Unconfidential Cook

The recipe exchange for discerning palates.

Betchacanteatjustone's Blog

sweet treats from Katie's kitchen!

The Craving Chronicles

I have a sweet tooth and I'm not afraid to use it

in pursuit of more

the blog about living with (just a little) less

Au Natural Skin

A guide to beautiful, healthy looking skin